
An item in Square is one thing the restaurant sells: a cheeseburger, a coffee, a slice of cake. Every item is created once in the Square Dashboard, and every register, tablet and online channel reads it from there. The steps below follow the Item Library path, with the screen for each step.
Step 1: Open the Item Library
Sign in to the Square Dashboard. In the left sidebar, open Items & services, then Items, then Item library. The library is a list of everything already in the account, with a search box, a category filter and a status filter across the top.

Step 2: Click Create item
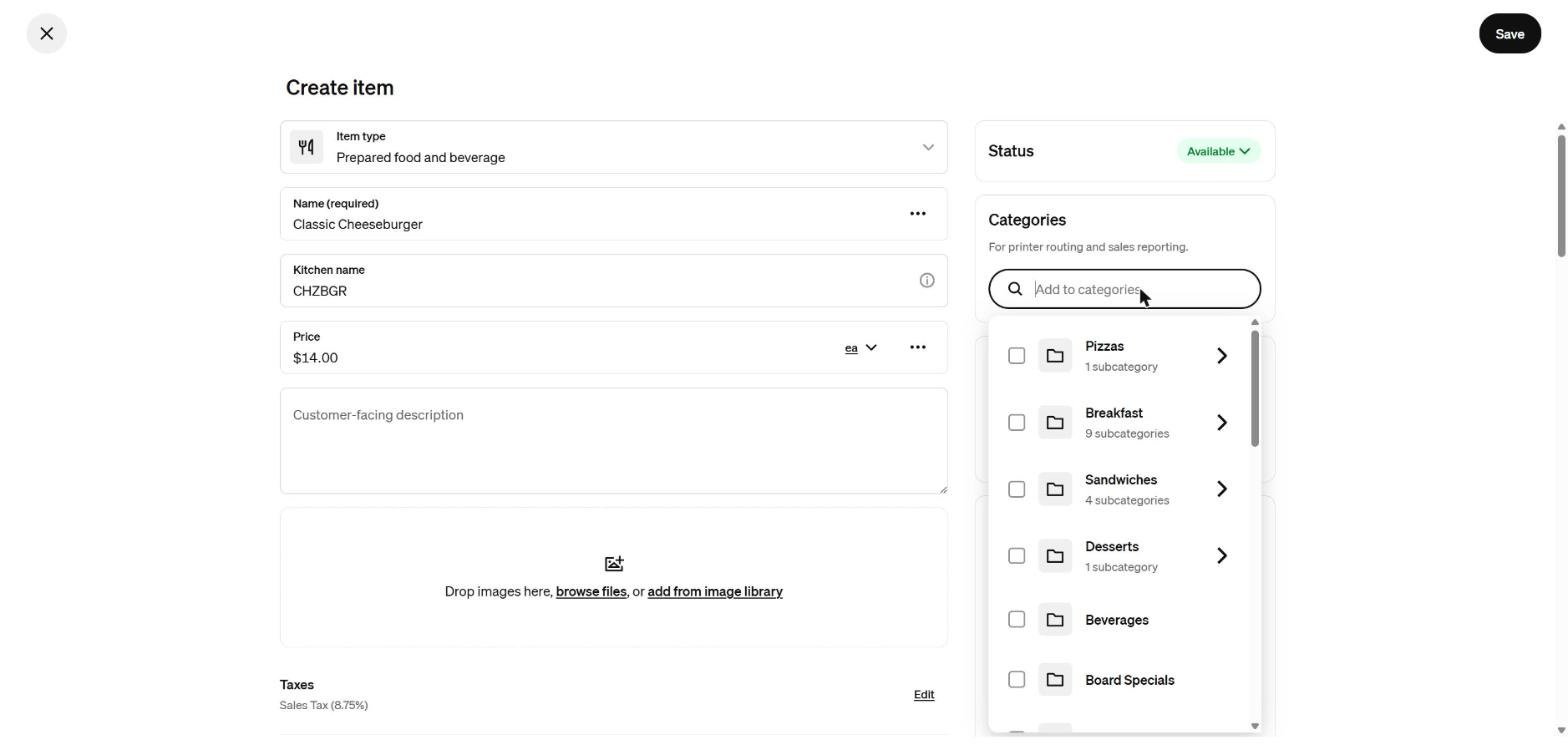
The black Create item button sits at the top right of the library. It opens a blank form. The Item type at the top of the form is already set to Prepared food and beverage, which is the right choice for a menu item at a restaurant.

Step 3: Enter the name, kitchen name and price
Only the name is required. The form also asks for a kitchen name, a price and a customer-facing description. Square’s help page for restaurants calls the kitchen name the Kitchen Facing Name. The example uses a short code, CHZBGR, in that field.
- Name: Classic Cheeseburger
- Kitchen name: CHZBGR
- Price: 14.00
Step 4: Pick a category
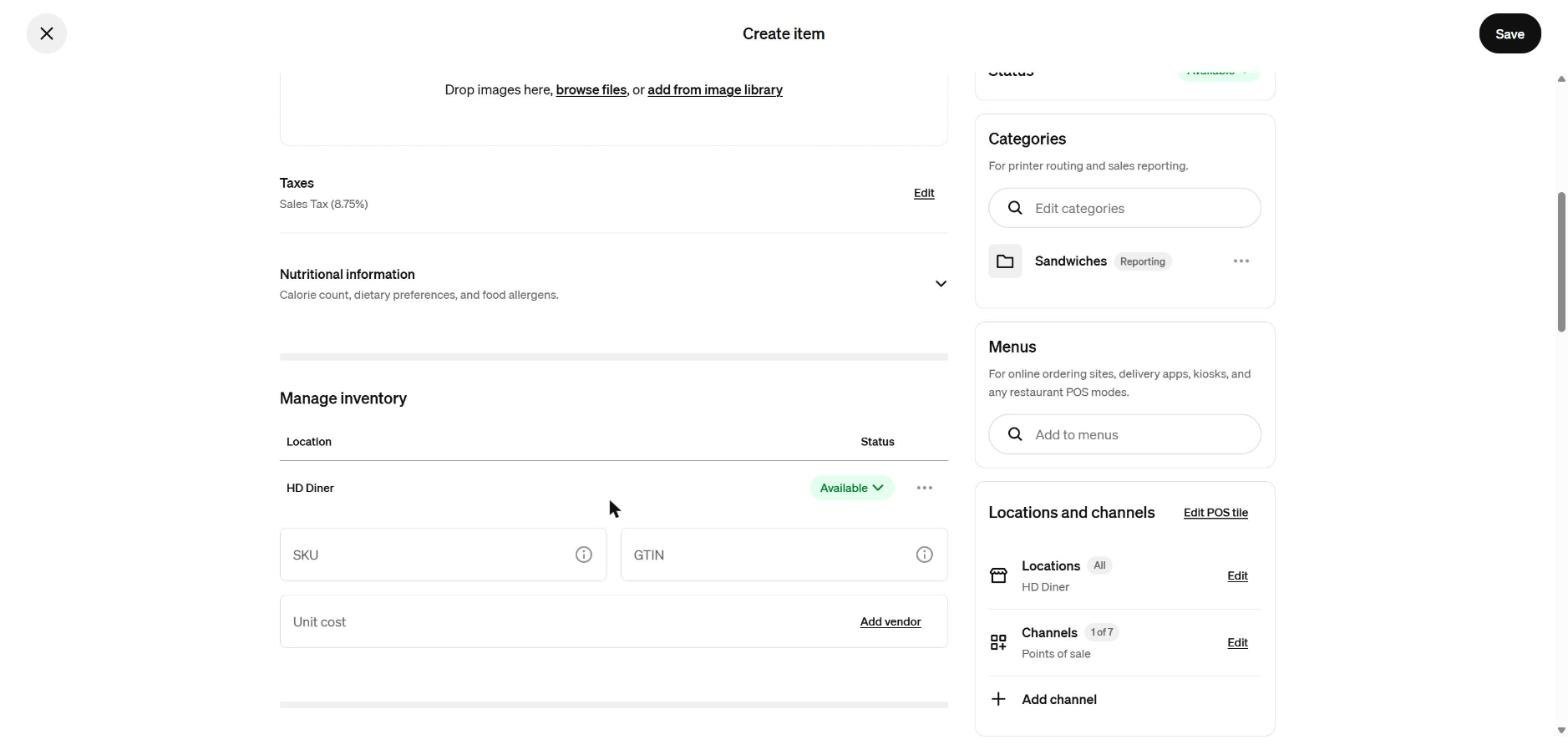
In the Categories box on the right, click Add to categories. A list of the account’s existing categories opens, each with a checkbox. Tick one and the category appears under the box with a Reporting tag. Square’s own label for this box is “For printer routing and sales reporting,” so the category does two jobs: it decides how the item is grouped on reports, and it feeds printer routing.

Step 5: Check taxes and inventory settings
Scroll down. The Taxes line shows which tax applies to the item, here Sales Tax at 8.75%. Under Manage inventory, each location has a status, set to Available by default, plus optional SKU, GTIN and unit cost fields. A vendor can be attached from the Add vendor link. None of these is needed to sell the item.
Step 6: Add the item to a menu
The Menus box on the right decides where the item appears. Click Add to menus and choose the menu from the list. Square’s restaurant help page states that items created from the Item Library are not added to a menu automatically and have to be added manually. An item that is in the library but on no menu will not show up on the restaurant register.

A Square staff reply in the Seller Community adds one limit: Square for Restaurants has no bulk option for adding existing library items to a menu, so each item is added one at a time.
Step 7: Add variations or modifiers if the item needs them
Further down the form are optional sections. Variations are for portions or sizes with their own prices. Modifiers are for toppings, sides and special requests. Recipe, marked Beta, tracks ingredient cost and profit margin. Bundle is marked Upgrade. A plain item with one price can skip all of them and be saved as it is.

Step 8: Save the item
Click Save at the top right. If the form is closed first, Square warns about unsaved changes and offers Discard or Save, which is how the sample item in these screenshots was thrown away. After saving, type the item name into the Search box at the top of the Item library to confirm it is listed, then check the menu it was added to.
Other ways to create an item
Square’s restaurant help page lists three places to create an item: the menu editor in the Dashboard, the Square Restaurants POS app on an iOS tablet, and Square Restaurants POS on a Square Register or Square Terminal. The Dashboard route above is the one with every field on one screen. The menu editor route adds the item to a menu in the same move, which removes Step 6.
For informational purposes only — consult a licensed attorney, tax professional or financial advisor.
Referral: The Heritage Diner runs its register, loyalty program and payroll on Square. A business that signs up through this Square referral link and takes its first payment earns a reward for both sides. Disclosure: Peter Kalafatis has a financial interest in Square referrals.
Sources
- https://squareup.com/help/ca/en/article/8149-create-items-with-square-for-restaurants
- https://community.squareup.com/t5/Orders-Menu-Items-Catalog/Add-all-items-to-menu/m-p/706938/highlight/true
- https://www.youtube.com/watch?v=iDo7vs26Z6M
Screenshots were taken from the Heritage Diner’s Square Dashboard on November 8, 2026.